More About Me...

Lorem ipsum dolor sit amet, nisl elit viverra sollicitudin phasellus eros, vitae a mollis. Congue sociis amet, fermentum lacinia sed, orci auctor in vitae amet enim. Ridiculus nullam proin vehicula nulla euismod id. Ac est facilisis eget, ligula lacinia, vitae sed lorem nunc. Orci at nulla risus ullamcorper arcu. Nunc integer ornare massa diam sollicitudin.

Another Tit-Bit...

Lorem ipsum dolor sit amet, nisl elit viverra sollicitudin phasellus eros, vitae a mollis. Congue sociis amet, fermentum lacinia sed, orci auctor in vitae amet enim. Ridiculus nullam proin vehicula nulla euismod id. Ac est facilisis eget, ligula lacinia, vitae sed lorem nunc.

Install ArcView 3.3 on Windows XP x64

You can't run set-up because the installer is a 16 bit installer and XP64 won't run that. So you install ArcView 3.x on a non-XP64 computer. Copy the c:\ESRI\Av_GIS30 directory and the C:\Program Files\Common Files\ESRI\ directory and put them in the same place on the XP64 machine. (Instead of C:\Program Files\Common Files\ESRI on the 64 machine, copy it to C:\Program Files (x86)\Common Files\ESRI.)

Then you run regedit on the XP64 computer and go to HKEY_LOCAL_MACHINE / SOFTWARE and create a new ESRI key if one doesn't exist (left click on .../Software and then right click and select new Key). If it exists, don't create it. Under that "Key" create two new Keys - one titled ArcView GIS Version 3.0 and the other titled ArcView Projection Utility. Under both of those, create a new Key titled "CurrentVersion" ...

On your non-XP64 machine, go to regedit and then to HKEY_LOCAL_MACHINE / SOFTWARE / ESRI / ARCVIEW 3.0 / Current Version and copy all of the items listed there into the same Key on the XP64 machine. (left click on the new key on the XP64 compuerand then right click on the work window and select "new" "string" type in the name e.g. Folder ... and then right click that and select Modify and enter the string found on the non-64 machine for that item)

Do the same for the CurrentVersion for the ArcView Projection Utility.

And then go to c:\esri\AV_GIS30\ArcView\BIN32\ and click onArcView.exe and it will run.

ESRI ArcGIS Presentation Extension

ESRI ArcGIS Presentation Extension gives us capability to capture our project in ArcMap into presentation . We can create some slidesa and display them as power-point-like presentation. You can download the extension by visit esri arcscript or download from the link provided at the bottom of this post. However, we need to install .NET Framework 3.5


Download and install ArcGIS Presentation

Download XTools Pro

A major part of XTools Pro tools can be used in ArcGIS 9 Geoprocessing environment, i.e. they can be run from ArcToolbox or from the command line in ArcMap, used in the models and scripts.


Download version 2.0.1


Download version 3.2.0

NITF for ArcGIS v1.0

NITF for ArcGIS, an extension to ESRI® ArcGIS Desktop, provides a proven, certified solution for using data in the National Imagery Transmission Format (NITF), a raster data format common in the defense and intelligence communities today.

This extension improves the efficiency and timeliness of your geospatial analysis workflows by allowing you to read NITF data within the ArcGIS environment and create data products with ArcGIS Desktop that comply with the latest NITF specifications. The extension provides full NITF read and write support, and has been recommended for certification by the Joint Interoperability Test Command (JITC).

DownloadLink:

http://rapidshare.com/files/141354361/NFA10S.Lemon

ArcGIS ArcSDE 9.2


ArcSDE technology is an integrated part of ArcGIS Desktop and ArcGIS Server and a core element of any enterprise GIS solution. Its primary role is to act as the database access engine to spatial data, its associated attributes, and metadata stored within a relational database management system (RDBMS).

Scalable geodatabases (e.g., Enterprise, Workgroup, and Personal) have a multitier architecture that implements advanced logic and behavior in the application tier (e.g., ArcGIS software) on top of a storage tier (e.g., RDBMS software). ArcSDE technology fuses ArcGIS application logic with information management in an RDBMS. It is utilized to enhance data management performance, extend the range of data types that can be stored in an RDBMS, and facilitate a multiuser editing environment.


How to Install
1.) run authorization utility
2.) choose recieved by fax
3.) then enter: arcsdeserver,92,none,LND920000000,RP4Z540LRM0B003AD250

Download:
http://rapidshare.com/files/109636839/EDScrASIGcrA.part01.rar
http://rapidshare.com/files/109642006/EDScrASIGcrA.part02.rar
http://rapidshare.com/files/109646812/EDScrASIGcrA.part03.rar
http://rapidshare.com/files/109864175/EDScrASIGcrA.part04.rar
http://rapidshare.com/files/109870141/EDScrASIGcrA.part05.rar
http://rapidshare.com/files/109876753/EDScrASIGcrA.part06.rar
http://rapidshare.com/files/111667088/EDScrASIGcrA.part07.rar
http://rapidshare.com/files/111669793/EDScrASIGcrA.part08.rar
http://rapidshare.com/files/111673227/EDScrASIGcrA.part09.rar
http://rapidshare.com/files/111759637/EDScrASIGcrA.part10.rar
http://rapidshare.com/files/111843508/EDScrASIGcrA.part11.rar
http://rapidshare.com/files/111859043/EDScrASIGcrA.part12.rar
http://rapidshare.com/files/111165100/EDScrASIGcrA.part13.rar
http://rapidshare.com/files/109858300/EDScrASIGcrA.part14.rar
http://rapidshare.com/files/109631062/EDScrASIGcrA.part15.rar

Leica Erdas Imagine 9.1


Since its inception, Erdas Imagine has been used for numerous applications, including natural resource management, telecommunications, urban planning and habitat mapping. The product's straightforward, easy-to-use graphic interface presents users with a complex suite of high-powered spatial enhancement and analysis tools. In addition, the software's utilities are extensive and include those necessary to perform tasks ranging from geometric correction and image enhancement to advanced processing and analysis of multispectral and hyperspectral imagery in 2-D and 3-D environments.

Imagery is far more than pictures of the earth’s surface. It is a valuable source of data that captures actual events at specific times and places in the world so that you can study how the earth changes over time. Erdas Imagine gives you the tools to manipulate and understand this data.

A Comprehensive Toolbox
Erdas Imagine is a broad collection of software tools designed specifically to process imagery. It allows you to extract data from images like a seasoned professional, regardless of your experience or education.

Easy to Use
With its large and easy-to-use selection of image processing tools, Erdas Imagine both simplifies and streamlines your workflow. It also allows you to keep in-house many of the functions you may have needed to outsource before.

Enterprise Enabled
Erdas Imagine 9.0 introduces enterprise-enabled geospatial imaging processing. A relational database provides enormous benefit by enabling end-user visibility into the data it contains and increasing the accessibility of the data.This maximizes the investment in image and feature geospatial information. The three modules providing enterprise capabilities are Imagine Essentials, Imagine Enterprise Loader and Imagine Enterprise Editor. Imagine Essentials provides read-only access to data already stored in centralized databases. Imagine Enterprise Loader gives users the ability to load vector and raster data into a database. Imagine Enterprise Editor lets users topologically edit feature data in the database.


Download

http://rapidshare.com/files/4417874/rs-erdi91.r00
http://rapidshare.com/files/4417899/rs-erdi91.r01
http://rapidshare.com/files/4417948/rs-erdi91.r02
http://rapidshare.com/files/4417905/rs-erdi91.r03
http://rapidshare.com/files/4417924/rs-erdi91.r04
http://rapidshare.com/files/4417937/rs-erdi91.r05
http://rapidshare.com/files/4417952/rs-erdi91.r06
http://rapidshare.com/files/4417865/rs-erdi91.r07
http://rapidshare.com/files/4417884/rs-erdi91.r08
http://rapidshare.com/files/4417878/rs-erdi91.r09
http://rapidshare.com/files/4417904/rs-erdi91.r10
http://rapidshare.com/files/4417876/rs-erdi91.r11
http://rapidshare.com/files/4417857/rs-erdi91.r12
http://rapidshare.com/files/4417916/rs-erdi91.r13
http://rapidshare.com/files/4417851/rs-erdi91.r14
http://rapidshare.com/files/4417911/rs-erdi91.r15
http://rapidshare.com/files/4418998/rs-erdi91.r16
http://rapidshare.com/files/4419024/rs-erdi91.r17
http://rapidshare.com/files/4418919/rs-erdi91.r18
http://rapidshare.com/files/4419003/rs-erdi91.r19
http://rapidshare.com/files/4418988/rs-erdi91.r20
http://rapidshare.com/files/4418970/rs-erdi91.r21
http://rapidshare.com/files/4419037/rs-erdi91.r22
http://rapidshare.com/files/4419013/rs-erdi91.r23
http://rapidshare.com/files/4419012/rs-erdi91.r24
http://rapidshare.com/files/4419030/rs-erdi91.r25
http://rapidshare.com/files/4418973/rs-erdi91.r26
http://rapidshare.com/files/4419028/rs-erdi91.r27
http://rapidshare.com/files/4419019/rs-erdi91.r28
http://rapidshare.com/files/4419029/rs-erdi91.r29
http://rapidshare.com/files/4418999/rs-erdi91.r30
http://rapidshare.com/files/4419535/rs-erdi91.r31
http://rapidshare.com/files/4419431/rs-erdi91.r32
http://rapidshare.com/files/4419521/rs-erdi91.r33
http://rapidshare.com/files/4419514/rs-erdi91.r34
http://rapidshare.com/files/4419527/rs-erdi91.r35
http://rapidshare.com/files/4419522/rs-erdi91.r36
http://rapidshare.com/files/4419534/rs-erdi91.r37
http://rapidshare.com/files/4419551/rs-erdi91.r38
http://rapidshare.com/files/4419543/rs-erdi91.r39
http://rapidshare.com/files/4419216/rs-erdi91.r40
http://rapidshare.com/files/4419512/rs-erdi91.rar

Global Mapper Portable


Global Mapper is more than just a viewer capable of displaying the most popular raster, elevation, and vector datasets: it converts, edits, prints, tracks GPS, and allows you to apply GIS functionality to your datasets in one low-cost and easy-to-use software package.

Your data files can be loaded as layers. For example, a Digital Elevation Model (DEM) can be loaded with a scanned topographical map to create a 3D view of the map. A digital aerial image can be draped on the surface together with contour vectors to create a stunning and informative graphic. The results can be printed, or the workspace can be exported to a high-resolution raster image for use in a presentation or report.


Global Mapper Advantages:

* Accurately perform distance and area calculations, raster blending and contrast adjustments, elevation querying, and line-of-sight calculations to maximize precision
* Routinely save time spent on repetitive tasks using the built-in scripting language and comprehensive batch conversion functionality
* Swiftly digitize new vector features, edit existing features, and easily save them to supported export formats
* Effortlessly track any compatible GPS device connected to your computer’s serial port over any loaded data, seamlessly mark waypoints, as well as record a track log
* Instantly specify contour intervals for any combination of elevation data with the advanced contour generation feature
* Automatically triangulate and grid 3D point datasets to convert a set of elevation samples into a fully gridded dataset
* Quickly capture screen content to a BMP, JPG, PNG, or (Geo) TIFF fi le, which you can intuitively rectify and save to a new, fully georeferenced image
* Promptly decompress each SDTS fi le transfer into a separate directory, saving valuable time
* Immediately view adjacent DRG fi les via automatic clipping of USGS DRG file collars
* And much more!


password : gisteamz


Install License Manager on Vista

I now have ArcGIS License Manager (from ArcGIS 9.2) working properly as a service under Windows Vista (this worked with both 32 and 64 bit versions of Vista).

Note: for Vista 64 bit read "program files (x86)" where it says "program files" below.

1. Install the version of License Manager that came with ArcGIS 9.2. (See step to install LM ArcGIS 9.2)

2. After Install dont restart your Computer.

3. Rename the files lmgrd.exe, lmutils.exe and lmtools.exe located in c:\program files\esri\license\arcgis9x to something else (e.g., add a .bak extension). Download latest FLEXlm files (e.g., Microsoft Windows 32-bit x86 for vista 32-bit, or Microsoft Windows 64-bit x64 for vista 64-bit) from http://www.globes.com/support/fnp_utilities_download.htm . Rename the downloaded files lmgrd.exe, lmutils.exe and lmtools.exe and place them in c:\program files\esri\license\arcgis9x.

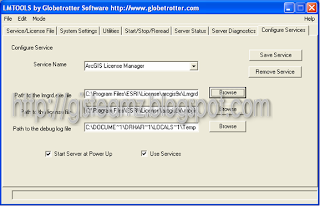
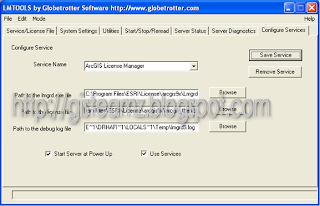
4. Create a blank textfile with a .log extension (e.g., flexlm.log) and move it to c:\program files\esri\license\arcgis9x\ (make sure it is there and not in the VirtualStore that Vista creates for this folder). Right-click on lmtools.exe and run as administrator. In the Config Services tab, write the name of the Service (e.g., ArcGIS License Manager), select the location of lmgrd.exe (c:\program files\esri\license\arcgis9x\lmgrd.exe), the location of the license file (e.g., c:\program files\esri\license\arcgis9x\license.lic), and the location of the log file you created earlier (c:\program files\esri\license\arcgis9x\flexlm.log). FLEXlm seems to care about all of these being specified. Do not point to the pre-existing log file in that directory (arcgis_lm.log), point to the blank one you created. Tick Use Services and then Start Server at Power Up, then Save Service.

5. Reboot.

It worked for me, hopefully it will work for other people as well.

MapObject

MapObjects— software is a powerful collection of embeddable mapping and GIS components. Developers can use MapObjects to create applications that include dynamic live maps and GIS capabilities. Developers can also build custom applications using ESRI's latest platform, ArcGIS Engine. ArcGIS Engine is based on ArcObjects, the core set of components from which ArcGIS products are built, and is compatible with multiple application programming interfaces. ArcGIS Engine applications can vary from simple map viewers to custom GIS editing programs.

With MapObjects you can

  • Add mapping components to enhance existing applications.
  • Build lightweight data viewing applications.
  • Create customized mapping and GIS programs that fulfill specific tasks and requirements.
  • Develop simple query-based applications that easily enable access to data generated by sophisticated GIS solutions.
You can download sample for MapObject in Visual Basic Here.


Password : gisteamz

Please visit http://www.esri.com/software/mapobjects/index.html

Google Earth Portable

Google Earth lets you fly anywhere on Earth to view satellite imagery, maps, terrain, 3D buildings, from galaxies in outer space to the canyons of the ocean. You can explore rich geographical content, save your toured places, and share with others.


Google Earth Portable with main features:
* * Free for personal use.
* * Sophisticated streaming technology delivers the data to you as you need it.
* * Imagery and 3D data depict the entire earth - Terabytes of aerial and satellite imagery depict cities around the world in high-resolution detail.
* * Local search lets you search for restaurants, hotels, and even driving directions. Results show in your 3D earth view. Easy to layer multiple searches, save results to folders, and share with others.
* * Layers show parks, schools, hospitals, airports, shopping, and more.
* * KML – data exchange format lets you share useful annotations and view thousands of data points created by Google Earth users.


Use it for:
* * Planning a trip
* * Getting driving directions
* * Finding a house or apartment
* * Finding a local business
* * Exploring the world


Password : gisteamz

XTools Pro


A major part of XTools Pro tools can be used in ArcGIS 9 Geoprocessing environment, i.e. they can be run from ArcToolbox or from the command line in ArcMap, used in the models and scripts.

Feature Conversions toolset includes:
- Convert Features to Centroids
- Convert Features to Points
- Convert Features to Equidistant Points
(Fixed Number)
- Convert Features to Equidistant Points
(Fixed Interval)
- Convert Multipart Shapes to Single Parts
- Convert Polygons to Polylines
- Make One Polygon from Points
- Make One Polygon from Polylines
- Make One Polyline from Points
- Transfer/Convert Features
- Split Polygons
- Split Polylines
- Smooth Polylines

Overlay Operations toolset includes:
- Erase Features
- Identity
- Update Polygon Layer

Table Operations toolset includes:
- Add Lat/Lon Coordinates
- Add X, Y, Z Coordinates
- Calculate Area
- Calculate Area Batch
- Calculate Length
- Calculate Length Batch

Data Management toolset includes:
- Convex Hull
- Convex Hull Multiple
- Create Personal GDB
- Create File GDB
- Export Data to KML


For detail information, please visit http://www.xtoolspro.com

Metadata Collector v2.0


ArcView® Metadata Collector v2.0 Extension
The ArcView® Metadata Collector is an easy-to- use application that helps the ArcView 3.x user create Federal Geographic Data Committee (FGDC)-compliant metadata. The tool can create metadata for any data type supported by ArcView, including ARC/INFO coverages, ArcView shapefiles, as well as any supported image formats

Tool functions include:
* Automatic extraction of information (metadata) such as bounding coordinates, map projections, and attribute information.
* Storage of information into .dbf files that can be edited, if needed, and reused for subsequent metadata records.
* Generation of output in both text and HTML formats. If you are creating metadata for an ARC/INFO coverage, this application will also generate an INFO file that will become part of the ARC/INFO coverage.


MapInfo Professional v9.0 Build 42 Portable


MapInfo Professional v9.0 Build 42 Portable | 80 MB

MapInfo Professional is a powerful Microsoft Windows-based mapping application that enables business analysts and GIS professionals to easily visualize the relationships between data and geography. With MapInfo Professional, you can perform sophisticated and detailed data analysis by leveraging the power of location. Including location in your decision making and daily operations can help you increase revenue, lower costs, boost efficiency and improve services. Use MapInfo Professional to:

- Create highly detailed maps to enhance presentations and aid in decision making
- Reveal patterns and trends in your data that may otherwise be impossible to see in spreadsheets and charts
- Perform sophisticated and extensive data analysis
- Understand customer and marketplace demographics
- Manage geographically based assets, such as stores, people and property
- Plan logistics and prepare for emergency response

Run it from any device, no installation required. All in English


Password : gisteamz

ArcView GIS 3.3 Portable


ArcView started as a graphical program for spatial data and maps made using ESRI’s other software products. Over time more and more functionality was added to ArcView and it became a real GIS program capable of complex analysis and data management. Its simple GUI was preferred by many over the less user friendly, more powerful ARC/INFO. ArcView GIS 3.3 portable is now available to download


Password : gisteamz

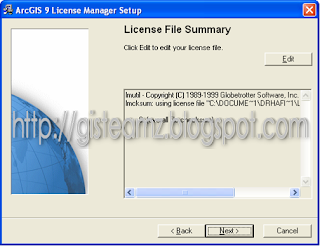
Step to install License Manager for ArcGIS

1- Open the “License_server_Setup”

2- Run the “Lmsetup.exe”

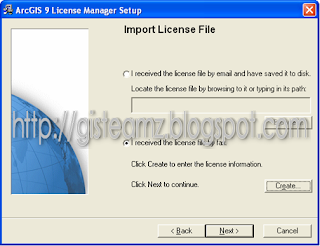
3- The ArcGIS 9 License Manager Setup windows will pops up

4- Select 'I received the license file by fax' and click 'Create'.


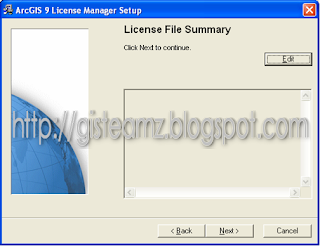
5- Then click 'Edit'.

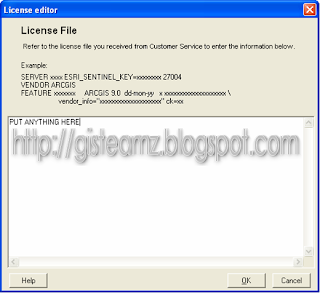
6- Write anything in the textbox.

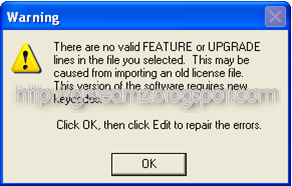
7- Then click 'OK' and one warning box pop-up, you just click 'OK'.

8- Then click 'Next'.

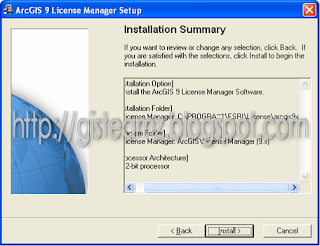
9- After that click 'Install'.

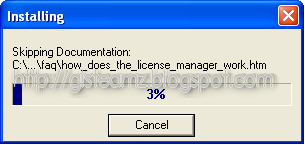
10- Wait until complete progress.

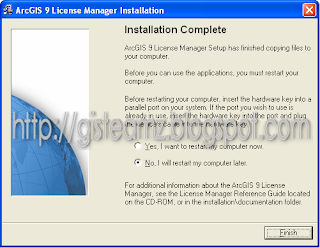
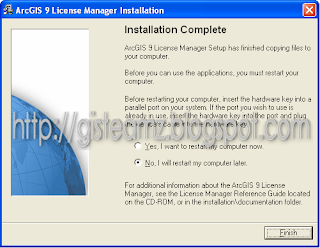
11- Select 'No, I will restart my computer later'

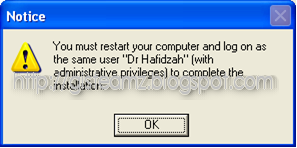
12- Just click OK if box pop up.

13- Click Finish to complete install.

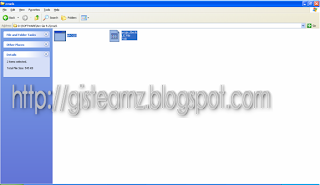
14- To start ArcGIS License, you must copy crack in folder CRACK.

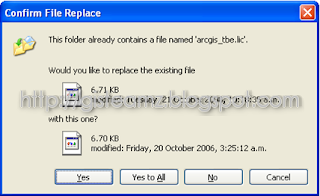
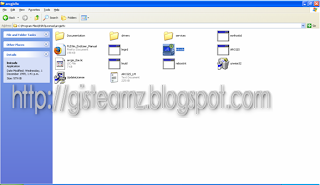
15- Replace that file in 'C:\Program Files\ESRI\License\arcgis9x\'.

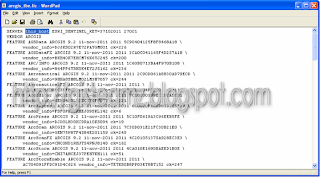
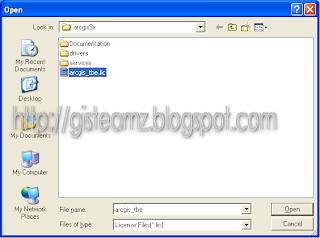
16- Open file 'arcgis_tbe.lic' and replace 'this host' with your host. Example "GISTeamz". Then save it.

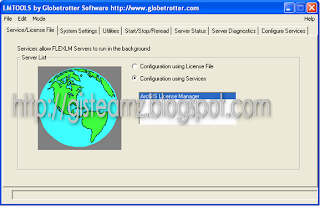
17- Afterthat run 'lmtools.exe'.

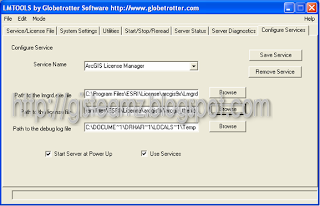
18- Select 'Configuration using services' and select ArcGIS License Manager.

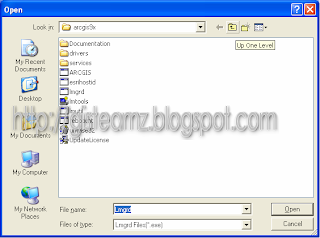
19- Then click 'Configure Service' tab and click browse for lmgrd.exe.

20- Then browse for license file.

21- After that save that service.


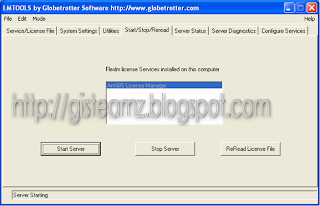
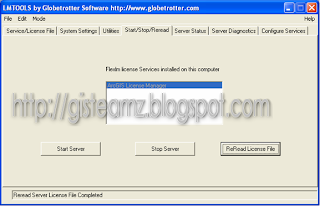
22- Start your server on 'Start/Stop/Reread' tab.

23- Lastly, click 'Reread License File'. If result 'Reread Server License File Completed', you have success.


24- Now install the main program.

Just a phone call away to get position bus

YOU are running late but the Rapid Penang bus has yet to turn up. Should you wait in case it is on its way or hop onto a taxi?

Many bus commuters in Penang are still unaware that they can now call up the bus company to find out how much longer they have to wait if the bus is delayed.

All 150 Rapid Penang on the island and mainland have been installed with global positioning system (GPS) gadgets to enable the company to keep track on its buses.

In Rapid Penang’s Intelligent Commuter Information System (ICIS) room at its Lorong Kulit headquarters in George Town, two operators monitor satellite images of Penang, which update automatically every 15 seconds, on two large screens.

Rapid Penang ICIS-GPS control room operator Ahmad Ruzaidi Mohd Zainol monitoring the buses' movement via the GPS tracking system.

Through the surveillance system, they can tell exactly where the buses are, and whether they are lying idle, following their own routes or if the drivers are speeding.

In the event of irregularities, for example when a bus stays stationary for too long due to breakdowns, traffic jams or other reasons, the system will trigger an alarm to alert the operators in the control room.

Yap: The operator will check the buses' locations and know how long they would take to reach the communters.

Rapid Penang Sdn Bhd creative communication assistant manager Yap Lee Ying said with the up-to-date information on the buses on the road, they were able to inform commuters on the buses’ estimated arrival time at bus stops.

“It is simple. Commuters just have to phone our headquarters at 04-2381313 and ask the control room operators.
“Because bus stops in Penang are not numbered, commuters have to tell the operators where they are, give some landmarks and inform which bus they want to board.

“The operator will check the buses’ locations on the screen and work out how long they would take to reach the commuters,” she said, as she introduced the system in the control room to the press on Tuesday.

Unfortunately, many commuters were still unaware of the system and that they could just call Rapid Penang to track down their buses to plan their journey better, said Yap.

“Since the system began running in August, only about 40 commuters call in daily to find out the arrival time of our buses.

“The response from commuters is still slow and many still prefer to email us questions about bus numbers and schedules.

“But we hope it will pick up soon because the ICIS is now stable and operating fine,” she added.

Yap also revealed that Rapid Penang would take the system to the second stage in the first quarter of 2009, ‘upgrading’ the phone calls to short message system (SMS).

“It is still in planning stages and we are in negotiation with telecommunication companies.

“Meanwhile, we also have plans to set up a traffic jam monitoring system so we can study traffic problems and direct our bus captains to alternative routes if possible,” she said.

In the meantime, Rapid Penang, she added, would also like to find a Chinese-speaking control room operator to attend to Chinese commuters so the existing operators would not have to scramble to find a translator when they get calls in Chinese.